A 12th Century Bliaut
 |
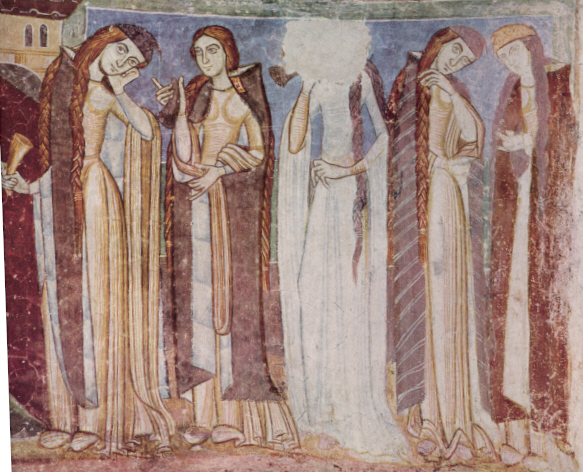
This is a pattern for a bliaut which both fits me and looks a lot like the
sculptures. It is on-line mostly so I can reproduce the bliaut or edit the
pattern easily. If you are trying to make a bliaut, hopefully it will
help.
The bliaut was worn by both men and women from around 1150 to 1250 all
over Europe.
These directions are based on (old site:
http://jauncourt.i8.com/bliautho.htm)
On Making Bliauts, or Norman Court Dress by Marguerie de Jauncourt and
on A Practical
Worksheet for Tunic Construction by Cynthia Virtue aka Cynthia du Pre
Argent. For the research behind the pattern, see Marguerie's
page. Marguerie's current website can be found here.
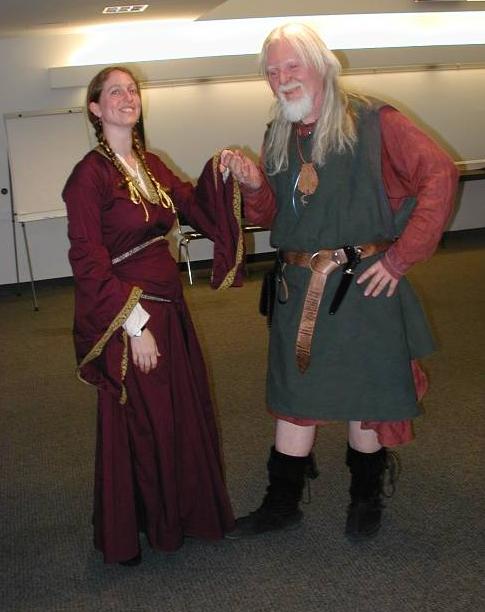
Me in a red bliaut (Novice Scola, East Kingdom, 10/23/03)
|
 |
Notes
My bliaut notes.
Length & Width
For a woman, the gown should fall to your toe tips or the floor. You want a
full skirt and I would suggest a bottom hem of around 200" wide. For a man,
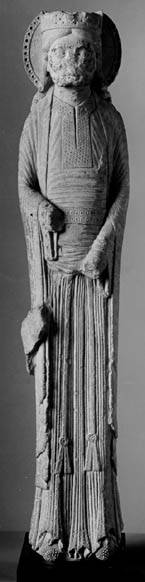
the gown should end near your knees (just beyond them) or at your toe
tips (like the king at the top left). If you choose knee length,
I would suggest a
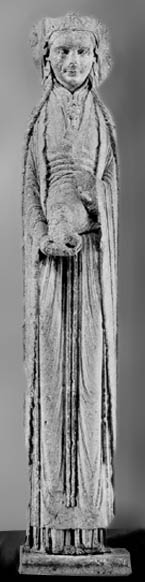
bottom hem of around 80-100" wide. The neckline in these instructions
is a slit neck (queen on top right). Other options include a rounded
neckhole(as seen in Terrance's Comedies) and a keyhole neckline (king
on top left).
Your Measurements (in inches)
- #1 Chest around:
Tummy around:
Hips around:
Largest of those 3:
- #2 Shoulder to bottom of gown:
- #3 Adams apple (or equivalent spot) to mid bust:
- #4 Around arm at shoulder:
- #5 Shoulder to wrist:
- #6 With arm down, wrist to bottom of gown:
- #7 Hip to bottom of gown:
|
 |
Gown Measurements
 |
- A (#1 + 1") / 2:
front and back panel width (1/2" seam on each side)
- B (#2 + 11") * 2:
front + back panel length + 10" for tummy wrinkles + two 1/2"
seams)
- C #3
front neck slit
- D 3"
back neck slit
- E #4 + 1":
arm width + two 1/2" seams
- F #5 - 3":
main arm length - 4" for draped sleeve + two 1/2" seams
- G How long you want the sleeve to hang (Less than #6) + 1":
draped sleeve length + two 1/2" seams
- H G + G + E + 6":
sleeve edging for arm width + drape*2 + seams + a bit for
oops
- J #7 + 1":
gore sides
- K (bottom width - (2 * A)) / 4:
gore width
Yes, The letter "I" is missing. It looks too much like a "1"
on some browsers.
|
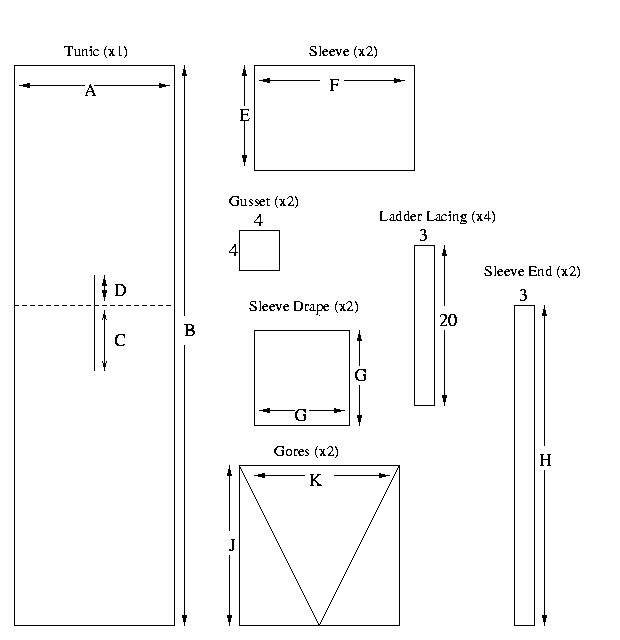
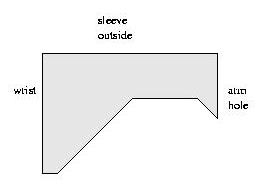
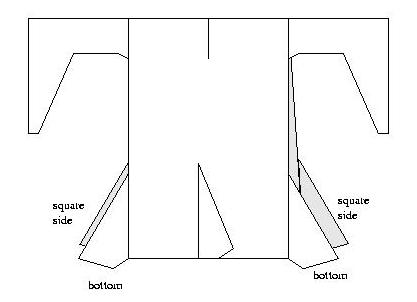
Panel Layout
| The drawing to the right shows all the panels in this
bliaut. The drawing below shows them assembled (it doesnt show the
gussets). The number beside each panel name indicates how many of the panel
you need. For instance, (obviously) you need 2 sleeves.
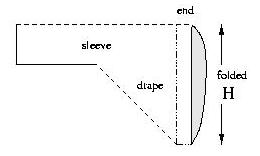
If measurement G is longer than 13-15", you will want to make the sleeve
drape into a G x 13" rectangle. In this case whe you cut the two drapes,
cut down the diagonals to make them into triangles. On one drape cut the
diagonal top left to bottom right. On the other drape, cut the diagonal top
right to bottom left.
Otherwise, you can leave the sleeve drape as a G x G square and not cut the
diagonals. |
 |
(From Marguerie's page). |
Getting Fabric
If you don't already have fabric, draw out your panels on paper assuming
36", 41", 45", and 60" fabric. This will give you the amount of fabric you
need for all the standard fabric widths. Convert your measurements to
yards. One yard is 3 feet (and 1 foot is 12"). Add 1/2 yard to each
measurement just in case.
Bliauts were usually made of wool, linen, or silk. Cotton was either
extremely rare or not found many places in the 12th Century. If you are
interested in accurate fabrics, stick to wool, linen or silk.
If you haven't made many outfits before and are nervous about this or have a
tight budget then you might want to consider cheaper fabrics. I have made
several bliauts out of $1 a yard cotton and found them very comfortable and
they looked good too. This could be as cheap as $5 for the whole
bliaut. If you love the results, you could buy more expensive fabric later
and make aother one. (This way if it doesn't come out right, you didnt use
up expensive fabric trying it).
If you are an experienced sewer (I always make a cheap fabric one
first but perhaps you sew more than I do) or have made an inexpensive
bliaut already, ask yourself "What am I making the bliaut for?" If its for
a fancy dinner perhaps you want silk (they wore silk bliauts as a court
dress). If its for a day to day event, you might want wool or linen
depending on whether its winter or summer.
You want a fabric which will drape well and fall into the folds seen in
the pictures above. This doesn't necessarily mean a thick fabric. Hold up a
bunch of prospective fabric and see if it drapes gracefully or tries to
stick out in gravity-defying angles on the way down.
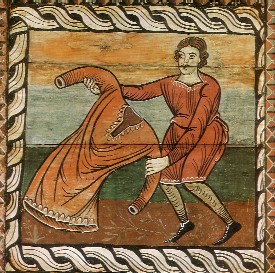
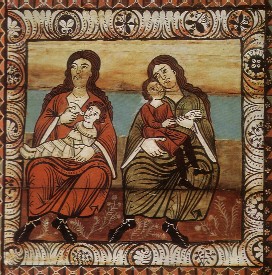
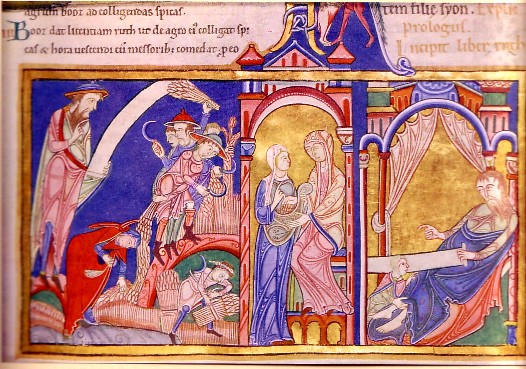
If you want to go for an accurate color, read up on 12th Century colors.
Aenor has written about English/French
clothing and colors. You can also see colors in paintings (Italian men's and women's bliauts, Swiss men's and women's bliauts), sculptures (Nordic women's bliaut) and books
(English Book of
Ruth).
Whatever you pick make sure its a color you like. If its
accurate and you hate it, what good was it? As a very general guideline, I
have seen almost every color but the florescents in some area or medieval
time. Some colors were more expensive and some were reserved for funerals
but that depends on the area and time period.
Don't forget to pick up a matching spool of thread. One should be
fine. Thread always looks a smidgeon lighter when its used than on the
spool. I would suggest worrying about trim after you are done with the gown.
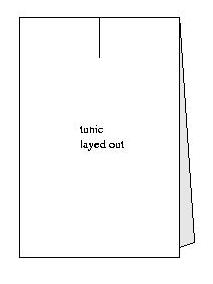
Drawing the Panels
Using a ruler, a measuring tape and chalk, draw all the gown parts on your
fabric. When you are done, check all your lines and make sure you havent
mismeasured or forgotten a piece. You will probly find it useful to draw in
(BUT NOT CUT) a dotted line on the tunic as shown. This will help you find
the shoulders later.
Cutting it out
|
Did you check all your measurements and lines at least twice? Ok, take a
deep breath and cut out the panels.
When you are done, there is one more cut to be done on the gore panels.
Draw curves on them to round off the corners shown here. Measure down the
sides of the gore J". Measure L" in from the corner. Connect the two points
with a curved line. For knee length bliauts, L should be around
3". For ankle or floor length bliauts, L should be around 10".
Cut the curvy corners off the gores.
|

|
Sewing it
|
Cut C and D if you havent already and slip the tunic over
your head. If the slit is too small, make it longer. Dont make the back
slit too long. It should come to your bust in front. There is evidence for
short neck slits and one all the way down past the bust. (NOTE TO SELF: Add
in pictures here).
|
|
|
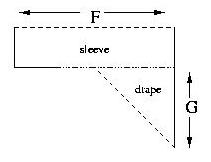
If you went with a G x G sleeve drape:
Fold it in half diagonally. Fold the sleeve in half and sew it to the
drape as shown. You will end up with a sleeve where the arm pit end isn't
sewn yet and the part at your wrist drapes down.
The sew the sleeve end around the big wrist opening. Put the join seam
on the bottom of the sleeve.
If you went with a G x 13" sleeve drape:
Sew two triangles together on the diagonals to form a long triangular drape. The
top edge is 13" and 13". The side edge is G and G. Make
sure you put your triangles together so two fabric outsides are together
(nothing is wrong side to right side).
Attach the top edge (13" and 13") to the sleeve and attach H to
the wrist opening as shown for the G x G sleeve drape.
|
|
|
Put on the sleeves. They should come to between your wrist and
knuckles. There are variations with longer sleeves (NOTE TO SELF: Add
in pictures here). If they are too long, mark the point where it hits your
shoulder and make it 1" longer than that. These sleeves cannot be easily
shortened by hemming the wrists.
|
|
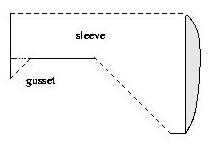
Now fold the gussets in half diagonally. Sew them to the sleeves at the
armpit as shown.
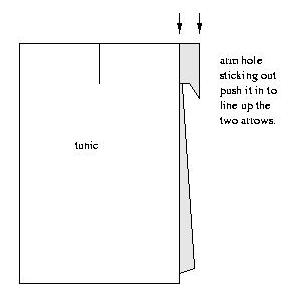
Lay the tunic down inside out. Turn the sleeve outside out. Place the
sleeve inside the tunic so the arm holes line up. Pin it so the sleeve
stays lined up (pin sleeve to tunic, not thru
tunic/sleeve/sleeve/tunic). Starting from the bottom of the arm hole, sew
around connecting the sleeve and tunic.
|
|
|
|
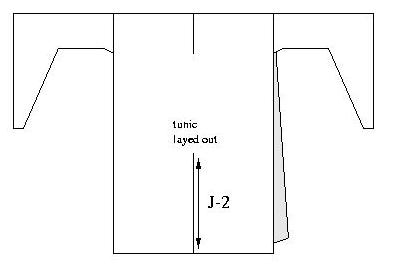
Turn the garment so all of it is inside out (the sleeves are no longer
tucked inside the tunic).
Find the center of each body panel at the bottom. Draw then cut a slit J-2"
long as shown in the left picture below. Your gores come in 2 types, 1
panel (the big ones) and 2
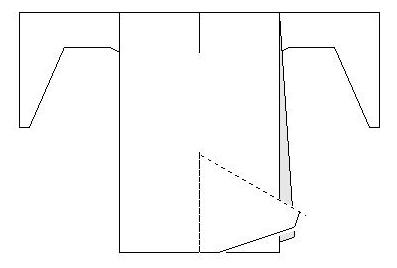
panel (the littler ones). Sew a big gores into each of these slits. The
right picture below shows the big gore after it is attached.
The gore is sewn to the tunic along its 2 sides and appears folded in half.
|
|
|
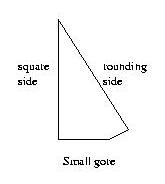
The smaller gores have 2 sides. One ends in a 90 degree angle (like the
corner of a square), the other ends in the rounding cut you made. See the
top right picture for an example. Hem the top corner of each small gore
down as shown in the middle right picture.
Sew the rounding side of each small gore to a side of the tunic so the
bottom of the tunic touches the point where the rounding starts. The
picture to the bottom right shows the 4 small gores sewn on but the
gown sides are still open.
Next sew the square sides of the gores together. Its fine if
the top part of the gores leave an inch or two of flat edge.
Put the bliaut on and decide where you want the side lacing to start. It
will end at the top of the side gores. Ladies, this garment will look best
if you do NOT wear a bra...18th C inventions...and sew the bliaut till just
where your bra line would be. Period artwork seems to suggest a
squashed bust was in vogue. If you prefer a modern silouette, try
fitting the gown tightly while wearing support. Lacing the side
openings tightly and giving just enought room upwards will cause the
dress to give you support.
|

|
|
Draw a curve from the opening start to the gores.
The depth of the curve depends on how curvy
you are. I'm a 38" 30" 38" so I give myself about 3" of depth to each curve.
You want to take the fabric from your largest measurement to your waist
measurement. You want the sides to lace tightly, not just closed. A smidge
too much curve means the sides don't exactly lace shut and THAT'S OK. A
smidge too little and the garment won't lace tightly. When you are
satisfied with your curve, cut it out. Try the garment on and pin it
shut. Remember, you will be hemming the raw edges. If its too big, cut
more. When you are done, sew the sides closed from the armpits to the top
of the curve and hem the edges of the curve.
|
|
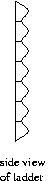
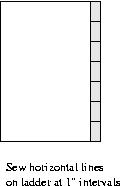
You cut fabric for lacing ladders...doubtless, you are saying to yourself,
"what's a lacing ladder". Well, I took the idea from a similar Spanish garment
about 100 years later. (I can no longer find the source). It's
basically a strip of fabric connected to the gown only at the
horizontal "rungs". This creates "holes" you can use to lace the gown.
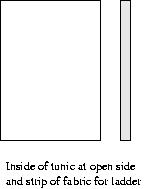
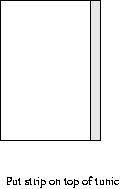
Hem the sides of each lace to make it into a flat strip of fabric.
Pin the lacing to the inside of the curve edges so the hemmed parts face each
other and are hidden. Sew a line across the lacing connecting it to the
curve every 1".
| 
|
|
|
Sew the side gores together.
Then roll hem (roll the edge till no raw parts show) the sleeve ends, neck
hole and any internal seams. Do NOT hem the bottom yet.
Take 2 laces (shoe laces are fine). Tie one end to the top rung of the
lacing ladder. While not in the garment, loosly lace the sides as shown in
The Zen of Spiral Lacing.
Put on the dress and give each side a good long tug till they are
tight. Tie an undo-able knot to secure each side and tuck the extra
shoelace into the gown.
Put the garment on and make sure the
bottom is roughly even. Now hem it.
| 
(From Marguerie's page).
|
|
|
Trim
Use trim to cover the obvious seams around the wrist and neck. Something
that looks woven or embroidered would be better than the late period fancy
looking trims popularly sold in fabric stores. I've been told orfois, gold
embroidered trim, was popular in the 12th C.
If I find proof, I'll post a picture here.
Wait! A whole lot of me shows at the sides and the neck!
So you put the gown on and a whole lot of skin is showing at the sides and
the neckline isn't something your mother would approve of...Oops. Well
that's what happens when you go out without your underwear.
Underneath this gown you wear a simpler gown or two. The undermost layer
needs to be sewn closed at the sides rather than laced. I have found that
lacing any undergowns makes the top lacing poofy but other people have had more
luck with it. You can manage with a simple T-tunic style under gown that
has a smaller neck opening than your bliaut and is about the same
length. The undergown should have fitted sleeves. There is evidence (POST A
PICTURE OF IT) that the sleeves could be too long forcing the undergown
sleeves to look scrunchy. I've tried making my sleeves fingertip length and
liked the scrunchy effect.
Accesssories
No outfit is complete without accessories. How often do you go to a fancy
event without shoes? Your bliaut needs a belt called a
ceinture. Its a long strip of decorated fabric with long stringy tassle
ends. It gets wrapped around you so the middle is in front just under your
bust. It crosses in back and ties just below the waist in front. The
tassles hang down. The ceinture can be faintly seen on both the king and
queen at the top of this page. Then you will need
shoes, a hairdo (braids, turban, veil for women), brais (for men),
leggings, jewelry,
pelice (women's overcoat), and a cloak. When you have all this....you are
one well dressed 12th C noble!
References