Creating a new module in ns-3

Standard

At times people create new functionality for ns-3 that takes the shape of module, that is, multiple files that implement various classes. If you’re looking for information on how to put together a new ns-3 module, you’ve come to the right place. I’ll walk you through a sequence of steps toward setting up your installation to build and recognize your module.

Step 1 – Create a directory for your new module

I’ll start the assumption that you are working with a tarball distribution – if you’re working with a mercurial repo, you’ll will know how to change the path names in this discussion. Say you want to create a new module for ns-3 and that you will want it to live in the contrib directory. This means your code will be in a path such as:

~/tarballs/ns-allinone-3.9/ns-3.9/src/contrib

For the sake of discussion, say your module is called “awesome”. Let’s further assume that it will live in a directory called:

~/tarballs/ns-allinone-3.9/ns-3.9/src/contrib/awesome

This is not just an assumption for the sake of discussion: it’s a requirement. The directory must have the same name as the module.

Step 2 – Tweak the build system

Before you write any actual code, let’s tweak the waf build scripts to take care of your new module. In a text editor, open file:

~tarballs/ns-allinone-3.9/ns-3.9/src/wscript

In this file, you will see a list of all the modules that the build system is already aware of. It’s appropriately called “all_modules”, and it will look like this:

all_modules = (
    'core',
    'common',
    'simulator',
    'contrib',
    'node',
    'internet-stack',
    'devices/point-to-point',
    ...
    'mpi',
    'contrib/topology-read',
    'contrib/energy',
    )

Add your new module to the list (perhaps at the end), so that it reads:

all_modules = (
    'core',
    'common',
    'simulator',
    'contrib',
    'node',
    'internet-stack',
    'devices/point-to-point',
    ...
    'mpi',
    'contrib/topology-read',
    'contrib/energy',
    'contrib/awesome',
    )

Next, change to the directory where your module lives. Following the pattern in this example, that would be:

~/tarballs/ns-allinone-3.9/ns-3.9/src/contrib/awesome

Now, create a new file called wscript in this directory. This file will state for the build system a complete list of your implementation (.cc) and header files (.h).

## -*- Mode: python; py-indent-offset: 4; indent-tabs-mode: nil; coding: utf-8; -*-

def build(bld):
    obj = bld.create_ns3_module('dcf', ['node'])
    obj.source = [
          'one_of_your.cc',
          'another_of_your.cc',
          ...
          ]
    headers = bld.new_task_gen('ns3header')
    headers.module = 'dcf'
    headers.source = [
         'one_of_your.h',
         'another_of_your.h',
         ...
    ]

Step 3 – Implement your module

By now, you have set everything up for the build system to create code for your new module. You might already have started on the development of the .cc and .h files for your module, but otherwise, you ready to start working on them. There’s more about creating a new module that I’ll address in a different post (I’ll come back to drop a hyperlink here when that is ready). For now, suffice to say that you’ll fall into the classic iterative pattern of software development: design, code, compile, run, and debug, repeating each of these steps as needed.

Remember that to compile, you will change to the directory at the root of your ns-3 distribution, which in our example has been:

~/tarballs/ns-allinone-3.9/ns-3.9/

To build in your new module, you do:

./waf build

If all goes well and your code compiled flawlessly, you can check out the fruits of your labor. Take a look at:

~tarballs/ns-allinone-3.9/ns-3.9/build/debug/ns3

You will discover that this directory contains a file called awesome-module.h, which corresponds directly to your new module. This is an aggregator header file, that is, a single header file which end-user C++ programs must include to use all the features implemented in your module. (The aggregator stands in for possibly multiple header files in your module.) These end-user scripts will be able to use your module after one single #include, such as:

#include “ns3/awesome-module.h”

Note that the ns3/ part in the path to your include refers to the directory under:

~tarballs/ns-allinone-3.9/ns-3.9/build/

which contains all the headers for all the modules in your installation. Depending on your particular configuration, this directory may be

~tarballs/ns-allinone-3.9/ns-3.9/build/debug/ns3
or
~tarballs/ns-allinone-3.9/ns-3.9/build/optimized/ns3

Step 4 – Create examples using your module

Finally, once you’ve tested and debugged your module, remember to be kind to the community and to leave some working code that demonstrates how one can use your work. Consider creating a directory such as:

~tarballs/ns-allinone-3.9/ns-3.9/examples/awesome/

which should contain one or more examples of how to use your module.

Looking at ns-3 packet traces

Standard

The ns-3 tutorial indicates that you can inspect the pcap files generated by simulations using two different tools: tcpdump and Wireshark (see section 5.3.2 Pcap Tracing).

Since tcpdump is a Unix tool that you’re most likely to find in your installation, let’s start there (tcpdump normally lives in /usr/sbin).  The tutorial recommends you to open your pcap files using the following command line:

 tcpdump -nn -tt -r filename.pcap

Where filename.pcap is obviously the name of a pcap file generated by some experiment. A quick look at the man page for tcpdump will tell you that the command line flags used above have the following meaning (quoted directly from Mac OS 10.5.8):

  • -n “Don’t convert addresses (i.e., host addresses, port numbers, etc.) to names.” This is the ideal choice in viewing simulation output because real world names won’t mean anything in the analysis of your experiment, where you address nodes by internal ns-3 identifiers or IP addresses. I haven’t been able to discover if there’s a difference between -nn and -n; both work the same way for me.
  • -r “Read packets from file (which was created with the -w option). Standard input is used if file is “-”.” Another obvious choice, since what you’re looking at is a packet trace that’s been recorded to a file.
  • -tt “Print an unformatted timestamp on each dump line.” The alternatives here are -t, which shows no timestamp on each line, or -ttt, which shows a time increment relative for the preceding line, or yet -tttt, which would precede timestamp by a date (the canonical Jan. 1st, 1970) that is meaningless to your experiment.

Bottom line: use the recommended flags. Running this on a pcap file generated by an ns-3 simulation would give you output such as:

1.008192 arp who-has 10.1.1.2 (Broadcast) tell 10.1.1.1
1.016602 arp reply 10.1.1.2 is-at 00:00:00:00:00:03
1.016602 IP 10.1.1.1.49153 > 10.1.1.2.discard: UDP, length 512
1.017515 IP 10.1.1.1.49153 > 10.1.1.2.discard: UDP, length 512
...

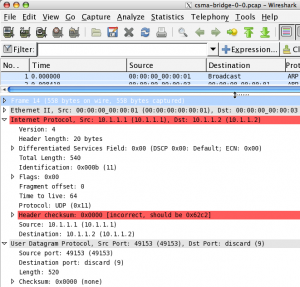
While tcpdump might suffice for many use cases, using Wireshark gives more detail through a very usable GUI. If you have it in your system, give it a spin, if not, it’s easily available for Windows and Unix systems (you can get binaries for Mac OS X >= 10.5.5, otherwise you need to use MacPorts). It’s a great application to capture packets on a live network, but also to analyze pre-recorded pcap traces. The added value in using Wireshark on ns-3 pcap traces is that you can inspect those nested protocol data units in all their glorious details. The screenshot provided here should give you a taste of it.

This is all fine and dandy, you say, but the question is: how can I make my simulation run generate a packet trace? The honest answer is that simulation runs don’t generate the pcap traces by default (remember that I/O has a performance cost?) At the same time, it’s nearly trivial to make it happen. Say that you have created an instance of a helper for the device in your network model. All you’d have to do is use this instance to call methods like EnablePcap or EnablePcapAll before starting the simulation run. For more details, you should check out the documentation for the ns3:PcapHelperForDevice class, which in inherited by the various device helper classes. If you want to see examples of code that enable pcap trace generation, change directory to the root of your ns-3 installation and run:

grep -r "EnablePcap" examples/

Fear of the big hammer

Standard

Power tools are dangerous. Be afraid of power tools. For instance “rm”, in a MacPorts installation is a power tool that can easily mutilate your set up.

I was annoyed at the amount of junk that got thrown into my system by a MacPorts install poorly done two years ago. So, I started removing packages (ports) here and there. At one point, Zeus knows why, I ended up at /opt/local/lib and noticed that I had a few “flavors” of libiconv. Like a n00b, I thought that the one with a number “2” in the file name was a file too many; maybe it had been left behind from the installation of a previous version. So, I did the unthinkable and “rm”-ed it.

It just so happened that that file was the newer version of the library, which was required by ns-3. What followed were almost two hours of irritation, as I tried to reinstall the libiconv port. It couldn’t be removed because of a large number of dependencies, so I tried “upgrade” and “build” and a few other port commands, but no luck: libiconv.2.dylib wasn’t being rebuilt. The next great idea I had was to try to remove all the dependents on libiconv, so that I could remove the library package and succeed at rebuilding from a fresh install. Considering that many of these dependents were involved in other long dependency chains, it turned out to be a bad proposition.

There was only one option left: the BIG hammer, the power-power-tool: do a port -f uninstall and assume that I could reinstall libiconv before any of its dependents would notice. The -f should scare any one once bitten. If I had been foolish enough to remove the libiconv.2.dylib in the broader of my Mac OS X installation, I’d gave gone up the proverbial creek. This was only MacPorts, though, so I thought it would be worth the risk. It was. I followed the uninstall with port clean libiconv, then with port install libiconv and voilà, I was back in business. ns-3 running happily again.

A post that was helpful in this venture can be found here – it taught me about otool(1) and reminded me of file(1), two commands that self-respecting hackers should keep in mind for the future. I have so much faith that this is good knowledge that I wrote this post out of selfishness first and foremost. Wanting to share it with you was only a side effect; sorry!